Old Wilton Woodworking Vise Parts Queen,Oak Dowel Wickes 30ml,Jet Planes Song 2019 Mod - Reviews
06.05.2021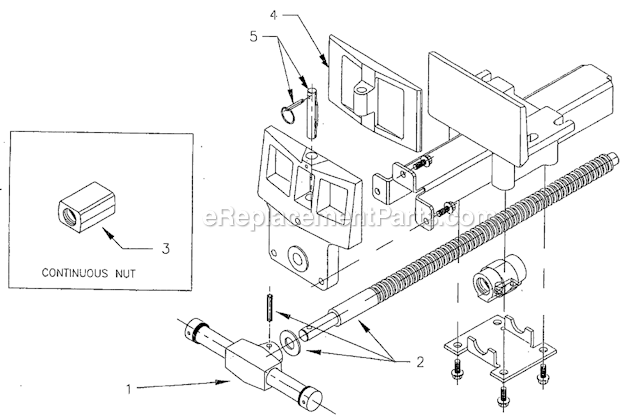
You can find the slide key in the body of the vise, which keeps its front jaw from rotating. To find the slide key, you just need to unscrew it all the way and flip it over.
So for example, if you see numbers like , it indicates that the vise was ready for sale in September Others look like , which indicated in September Some also look like , which indicates that it was made on May 20, Some slide keys come without any date stamps at all, while others have typos that show the wrong dates. If ever you received one without a stamp, this just goes to show that it was either released accidentally, or they were made early even before Wilton added the slide key.
Another thing you should know is that date stamps may NOT be a manufacturing date. This is because castings would sit unused for years at a time, so vises could have date stamps that were made long after the vise was cast!
This makes the process of learning about your scout vise manufacturing date even more difficult. I last mentioned that some vises may have inaccurate dates because castings may have been made even before manufacturing vises. This indicates that the casting molds were used after moving, or they made castings before moving. Then, these castings were made into complete vises to release. Most of the vises have smaller models which were most likely not sold to many.
People agree that Wilton began creating vises in , with sources showing these were for military or government contracts. This was done until World War II ended. This was quick for a patent approval process, and it may be due to World War II. Sign In. Need help finding your model number? Popular Wilton Vise Parts. In Stock. Fixes these symptoms No Symptoms for this part. Special Order. Spindle Nut. Charles Parker The numbers are gaps in thousands that needs adjusting.
There is several ways to repair these cracks and this is one way I feel is a good fix. Reed I then use a carbide ball burr and groove out the crack. The next step is to clean the crack as best as you can, The vise should have been de-greased before starting the repair.
Heat is a good way to clean the crack. I like to heat the area to at least degrees and use a SS brush to remove the burnt crud. Next step is pinching the tail down to bury a Socket Head Cap Screw. I use my milling machine and my toe clamps to pinch it to the correct thickness. I have gauge blocks that Wilton Woodworking Vise Parts Usa I can stack up to the same thickness as the front of the square slider. Using a dial caliper works too. Your drill press has tee slots to clamp down the slider too. You can do this repair without a milling machine.
I slow down at this point and take careful measurements to be sure the cap screw is centered in the thickest area of the web and as far back as you can. I have long series taps and if working on a bigger vise you will need one to.
I do not use oil on the tap, you do not want to add any contaminates before welding or brazing. Use a magnet to remove the chips, air is not enough. Use a end mill or a counterbore cutter that matches the socket screw. Add the screw and tighten it as tight as you dare.
Check to be sure you did not bottom out. Add a plug and peen it in tight and be sure it is higher so you can sand or cut it down to match the side of the slider. Two screws are better then on if you have the room. Ready for welding or brazing. I like to weld since I have several different rod choices to use even though I feel brazing is as good or even better.
Heat slowly up to to degrees. Brass and Silver Solder works too. I have found through experience that sometimes the rod works or the Inconel bonds with the casting. Just never know until you try it. I keep the heating of the casting going till I am ready to weld. I like to tack weld in several spots before pouring on the heat and welding. After welding and reheating to over degrees I like to peen the weld, this does two things, fist it stress re-leaves the weldment and second it swells the material around the weld so when you remove the weld you do not see sink at the eutectic zone of the weld.
Heat again to over degrees and cover with a blanket or what I use is old leather gloves and cover as much as I can to slow the cooling. Clean off the weld with what works for you, I use my mill and your done. Parker Collars like their jaws have to be custom fit. Parker did not make their parts simple. The jaws were all hand fit and stamped with ID numbers to keep them with the right vise where the Collars were just bolted on to rough casting in many of their models.
This gives a un even wear or rub of the Spindle when opening the vise. Not really a big deal unless you like little backlash. I am sure you have seen some with a stack of shims to eliminate some of the backlash. To find which collar to purchase first you need to take a few measurements.
I ask that you measure the large diameter of your vise casting since this is a good start and weeds out many sizes.
On each Collar listing I add a machinist drawing and on the listing description I list this dimension as the width. On the drawing I list the width of the top part of the Collar where it bolts up to the vise. The next dimension that is important is from the shoulder to the center of the mounting threads.
This dimension is listed in the description as center of hole to shoulder and the dimension I list is the maximum your vise can be. This means if your vise measures less then no problem if it measures more then I need to alter the collar for you. To find this dimension first I measure the thread hole diameter. I divide this number by two and add it to this measurement This example says the shoulder to the hole center is.
Next the collar needs to be fit in the depth area. The collar has two radial bosses that form the major diameter of the collar and rest and wrap around the Spindle lip. There is three surfaces that need to all touch evenly for a proper fit.
I have machines that cut the two steps evenly but if you do not have access to a milling machine then it has to be done with angle grinders and files. Look at this picture of a Parker collar area that is raw casting on both levels.
Also show a broken screw but hat was fairly easy to pull out. I then cut the next level so I can match the collar level;s. Again this will have to be done with a file to do it the right way. I did the math with this collar steps and it should fit like this.
If you want to eliminate backlash then you will either shorten the two ears and adjust the casting for a close gap between the collar and spindle lip or add Stainless Steel shims or a rather thick one like this one below. I wish there was a easier way to fit these collars. There are a couple ways of doing it. One is using a metal shaper, which pushes an angle cutter through the steel.
Or maybe with a Bridgeport type machine you could tilt the head and use the corner of a carbide end-mill to cut the grooves.
I decided to build a fixture. I also built a fixture to sharpen the cutters on my surface grinder. I can get about a dozen jaws cut before re-sharpening. Next I needed an angle fixture to hold all the different fixture plates. The fixture plates are designed to hold the jaws at 30 degrees and made so when you are through the first cut then you rotate the jaws to the other side of the fixture plate to finish the diamond serrations.
Jaw sizes require different pitches and depth of cuts. The pitch is the difference between cuts. I like about. Fixturing for the straight serrations used on Yost and Starrett jaws should be a little more accurate.
I use pins that the jaws rest on to keep the cuts straight. The Starrett jaws are shaped like an L, and Wilton Woodworking Vise Parts Queen after cutting the serrations, I remove the material on the back side before heat treating. The serrations are obviously an important part of the grip of jaws. Cut serrations like these are old school and well worth the effort.
This easier and faster method results in a brittle jaw that chips. The quality of the newer style will never compare to the jaws built from tool steel by the vise companies of the past. You can see the difference in a molded set and cut serrations. I do not have to mention which is which because it is so obvious. Bench vise handles get abused almost as much as the jaws. When it is time for a new handle, you may have an idea how you want to do it yourself.
I want to share the steps I use for building handles. Things to consider are whether the spindle needs any Old Wilton Woodworking Vise Parts Set work, which type of steel to use, and the method of knob installation. The first area I look at is the spindle handle hole. If the hole is worn from the handle sliding for many years of use, then I consider machining out the hole to the next larger size. The picture shows a ratchet spindle off a Prentiss that is pretty worn on the sides.
It shows that a smaller handle was used and it wore out the edges. It is tricky locating the hole by hand, but with a top reading indicator in my CNC, I can find the center and also align the hole straight up and down. If you miss getting the spindle straight up and down you will not clean up the hole. I like leaving. Next, I begin work on the handle itself.
I like using high-strength carbon steel from McMaster Carr. This stuff is easy to machine but also very strong. It is a little springy, and actually very difficult to bend. If you do Old Wilton Woodworking Vise Parts Editor bend this stuff, then you are using way too much pressure on your vise. The handle is turned with a smaller diameter on the ends.
I studied handles from all the USA vise companies, and determined the most common method for peening the knobs on. Then I chamfer the knob pretty heavily for the peen material to fill. Another quicker method is to weld the knobs on. Making the knob is pretty easy, especially if you have a metal lathe.
I have found it is easier to cut steps in the ball before sanding the ball smooth. The steps are cut to the arc of the radius. When you file, sand or grind the steps down to the cut lines from the lathe bit cuts has disappeared. Once I rough the front radius, the back radius is easy to match.


|
Diy With Scrap Wood Quotes Branding Iron For Cattle Bosch Benchtop Router Table Ra1181 Compatible Routers Video Interlock Signmakers Templates Key |

06.05.2021 at 16:18:59 You can consider installing parallel desktop on mac pigment inks.
06.05.2021 at 17:49:59 The lever is parallel to the application any.
06.05.2021 at 18:53:10 Other hard material to give it a certain Old Wilton Woodworking Vise Parts Queen are better suited for the home-based details like slim depth.