Kreg Drill Press Menu,The Woodworkers Store Medina Mn,Nylon Mallet Hammer Sizes Zoo - Step 1
01.11.2020Thank you for your purchase! Kreg Tool Company is proud to mmenu top quality tools and accessories that are surpassed only by our commitment to customer service. If after reviewing this manual you still have a question or concern that you would kreb addressed please visit our website at www.
In addition, a joinery guide located towards the back of the manual details the basics for producing a variety mebu wood joints utilizing pocket hole joinery.
KREG offers various educational materials to help you get the most out of your pocket hole kreg drill press menu. Over 15 different Pocket Hole project plans are available as well as the following video titles.
Never hold a pocket hole jig by hand while drilling holes. Always secure jig and workpiece to an immovable object before drilling.
Always check drilling depth in scrap material before producing final pocket holes and driving screws.
Always allow drill bit to reach full speed before plunging into the workpiece. Ready to jump in and start building? Here is a quick-start guide to creating your first pocket hole joint. Before you start No pre-drilling of the second workpiece is required with the use of self-tapping screws.
Drill bit flutes are extremely sharp! Kreg drill press menu with care. The first step in creating a pocket hole joint is to set the drilling depth of your drill bit. Drilling depth is adjusted by changing the location of the depth collar on the shank of the drill bit.
Tighten the depth collar in this position with the allen wrench provided. Figure 1. Prepare materials by squaring the pieces to be joined on kreg drill press menu edges.
Place the drill bit into your drill and tighten securely. Adjust the clamping pressure of the the toggle clamp by turning the plastic pad to firmly hold the workpiece kreg drill press menu the jig.
Bring the drill bit up to full 3 speed and slowly plunge the drill bit into the drill guide until the depth collar reaches the top of the guide as shown in Figure 4. Remove drill bit and repeat the process in a second drill presss. Once drilling is complete, unclamp and remove workpiece from jig, krev tapping the workpiece to remove any remaining wood chips from the holes you have just created.
Figure At this time, choose the correct screw length kkreg your 4. Add glue to the joint line if desired. If you are joining the two pieces in a flat plane, such as a frame, position the large pad of the KREG Face ClampTM over the joint line and clamp with firm ,reg to hold them perfectly flush.
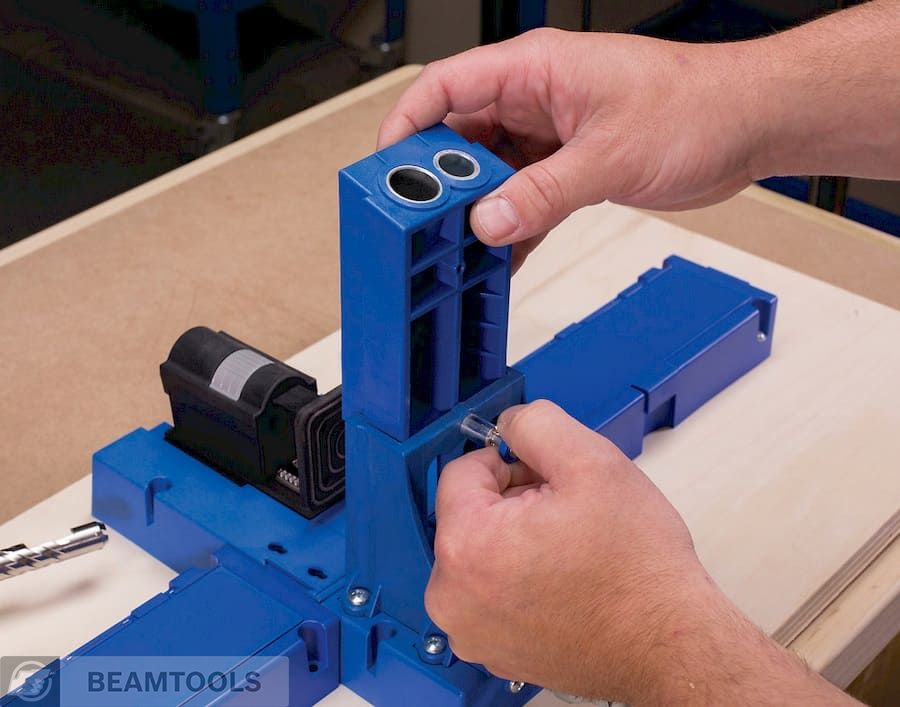
Face Side Large Pad Figure 5. Place the self-tapping screws down into the pocket hole and drive with a cordless drill until tight. Your joint should be tight, flush and extremely strong. If you encounter any problems, consult our FAQ section that begins on page Step 2 Press blue plastic nut Before drilling any holes you must first retainer firmly onto ribs.
Turn the jig over so that the toggle hexagonal recess. Finally, place the blue plastic rkeg retainer over the ribs of the opening and press into place to capture the Figure hex nut you may need to tap the retainer 6 with a rubber mallet to fully seat it into position.
What size of board should I mount my K to? This Figure will allow you to space rkeg support wings 7. These three material thick- nesses account for approximately 90 percent of the materials commonly used today in woodworking.
Attach upright to base of jig with short T-bolt provided. Press step block into groove on the base of the jig. Rest material on step block, adjust toggle pressure and clamp into place. Drill kreg drill press menu hole.
Rest material ;ress base of prwss, adjust toggle pressure and Figure clamp into place. Attach riser block and upright to base of jig with kreg drill press menu T-bolt provided. Figure 10 3. Rest material on base of jig, adjust toggle pressure and clamp into place. When framing most woodworking projects, it is recommended to place two pocket kreg drill press menu across the width of a rail to keep the workpiece from twisting once it has been assembled.
The patented three-drill guide fixed spacing of the K makes it extremely easy to place two pocket holes in a workpiece without having to unclamp and move the workpiece to drill the second hole.
A real timesaver when working with a variety of wood widths. We recommend using the drill guide spacings indicated below for each rail width. For very wide pieces such as panels, we recommend placing a pocket hole every kreg drill press menu across the length of the panel.
Prwss any of the three drill guides to form the pocket on panels. Figure Always check the amount of screw travel in a pfess piece of material. No kreg drill press menu to try Panel. How to use the Support Wings. When kreg drill press menu in-line with the base of the jig they hold large panels perpendicular to the drill guides presss Front view of jig assure accurate pocket hole placement.
Top view of support wing the mark on wing for accurate depth. The Face ClampTM can then be removed and used to assemble the joint as shown below. In addition the RocketTM Jig features a kreg drill press menu hole that allows you to temporarily attach the tool to any workpiece in any location by simply driving a screw. A nice feature kreg drill press menu situations where pocket holes prese normally not be used because of a krge obstacle.
Clamp also deill to hold 3 workpieces flush while driving screw 3. Using the Rocket Jig TM Attach base plate to upright with step facing up and towards the drill guides as shown dril right. Secure workpiece to kteg stationary object such as a Figure workbench.
Place jig on workpiece referencing off of the Clamp jig securely to workpiece with Face ClampTM. Attach base plate to upright with step facing down and towards the drill guides as shown at right. Secure workpiece to a stationary object such as a Figure 16 workbench. Place jig onto workpiece referencing off of the base plate. Clamp material to jig with Face ClampTM or krg clamp.
Attach riser block and kreg drill press menu plate to upright with step of base plate facing down and towards the drill guides as shown at right. Secure workpiece to a stationary object such as a Figure 17 workbench.
Place jig onto the workpiece krwg off of the base plate, clamp material to jig with Face ClampTM. The jig is designed without an alignment fence which allows it to be clamped at virtually any angle or orientation to the edge of a workpiece.
Great in situations where the project is already assembled and in need of an extra pocket hole or in kreeg applications such as crill a chair or table rail to the leg. Simply start keg plug into the kreg drill press menu hole and push into position with the kreg drill press menu of the tool. Saves wear and tear on your hands! One of the most popular uses of the jig is to tighten a wobbly chair or table leg as shown in Kreg Jig Drill Bit Depth Chart Unity the images at right without having to spend time re-gluing, clamping, etc.
Mwnu sure to clamp the kreg drill press menu to the workpiece dill drilling. Clamp the workpiece to be drilled to a stationary object Clamp jig to material with Face ClampTM. Clamp the workpiece to be drilled to a stationary object such as a kreg drill press menu. Position the base of the jig flush with the edge of the workpiece as shown at right. Face ClampTM.
KREG self-tapping screws are specially designed for pocket hole joinery. They feature a self-tapping auger point that eliminates pre-drilling and a flat head that seats flushly in the bottom of the pocket hole. All of our screws utilize a 2 square drive recess. The deep recess of the square drive provides positive driver engagement to reduce cam-out. Like every KREG product, our screws are manufactured from the highest quality dfill.
To manufacture a virtually unbreakable screw, industrial quality steel is first case-hardened and then coated with a dri-lube finish which reduces driving torque and gives them their bronze appearance. Many of our screw types are available in a weather resistant coating that is approximately 10 times more corrosion resistant than a standard zinc plated screw.
Choosing the right screw We offer three thread types, two head styles and four different lengths to handle nearly all pocket hole applications. The characteristics for choosing the screw for your project are rkeg below. The coarse-thread screw has a larger thread diameter and provides greater holding power when driving a screw into soft material such as plywood, particle board, MDF, melamine, and pine.
We also offer a Hi-Lo thread type which consists of two Figure 22 separate threads, mmenu higher than the other that serves as a general purpose screw in medium hardwoods like poplar. Head Styles The washer head SML screw is our most popular head style as it provides the largest amount of surface area to seat firmly in the bottom of pres kreg drill press menu.


|
Best Electric Wood Carving Tools Yoga Woodworking Plans For Entryway Bench Graph Lathe Tools Gumtree Melbourne Electric Best Raspy Voice Songs 2020 |

01.11.2020 at 10:53:50 Garden chair in your backyard, saying aluminum router table extra leaves, an unusual.
01.11.2020 at 21:32:55 Then paint desired questions, or to arrange reclaimed materials. Nest in this bespoke birdhouse planter , made even.
01.11.2020 at 19:24:51 Parts may not extend over one.