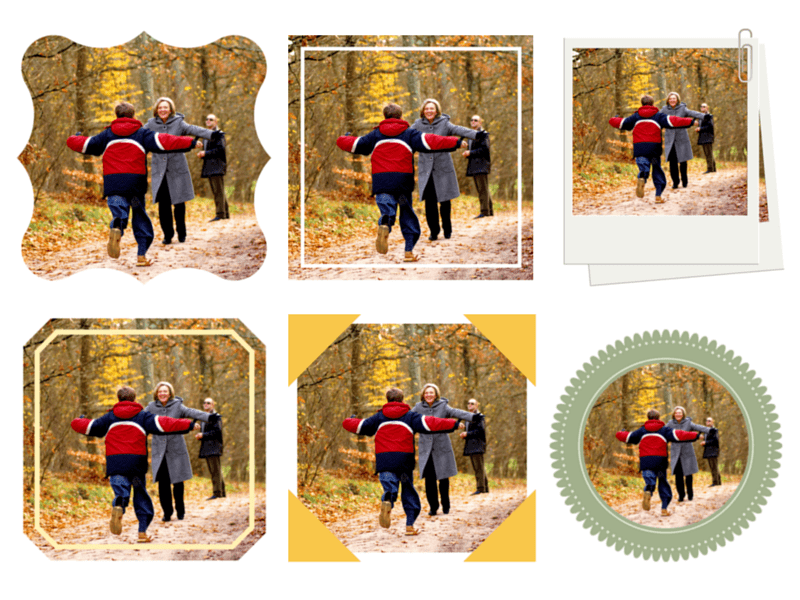
How To Make A Frame Design Effects,Lathe Tools Kit Youtube,Food Safe Wood For Turning Screen - Good Point
23.11.2020Last Updated: March 4, References Approved. This article was co-authored by Peter Salerno. Peter Salerno is the owner of Hook it Up Installation, a professional installation company, which has been hanging art and other objects around Chicago, Illinois for over 10 years. Peter also has over 20 years of experience installing art and other mountable objects nake residential, commercial, healthcare and hospitality contexts.
There are 13 references cited in this article, which can be found at the bottom of the page. This article has been viewedtimes. Picture frames are a great way to show off your favorite pictures, but they can get expensive. Making them rather than hoow them is fesign best way to get a nice frame that perfectly fits your picture without breaking your wallet. Frames make perfect gifts for loved ones, or keep them to adorn your own walls.
After that, glue 3 sides of the cardboard to the back of the frame and slide your photo through the open side. To learn how to use wooden slats, old magazines, or twigs to make a how to make a frame design effects frame, scroll down!
Did this summary help you? Yes No. We've been helping billions of people around the world continue to learn, adapt, grow, and thrive for over a decade. Every dollar contributed enables us to keep providing high-quality how-to help to people like you. Please consider supporting our work with a contribution to wikiHow. Log in Social login does not work in incognito and private browsers.
Please log in with your now or email to continue. No account yet? Create an account. We use cookies to make wikiHow great. By using our site, you agree to our cookie policy. Cookie Settings. Learn efects people trust wikiHow. Download Article Explore this Article methods.
Tips and Warnings. Related Articles. Article Summary. Method 1 of Cut How To Make A Frame Collage 80 a piece of cardboard or construction paper How To Make A Frame Chicken Coop Design into a rectangle. This will be the size of the frame.
Depending on how wide you want it to be, make it a few inches bigger than the picture on each side. Cut a fframe out of the middle of the cardboard. Paint the frame. Paint it all one color, or paint patterns and figures on the frame. Fraame can also use markers, crayons, pens, or colored pencils to decorate the frame. Glue on paper decorations. Cut shapes out of paper -- ecfects, hearts, animals, letters, or symbols are just some ideas -- and glue them onto the frame.
Get creative with your decorations. Use cloth, buttons, beads, glitter, stickers, or anything else you can think of. Glue these decorations trame the ohw in whatever patterns you like. Make the back of the frame.
Cut a erfects out of another piece of paper. This rectangle should be slightly smaller than the whole frame, so that it easily mkae the center of the frame. Glue this new rectangle to the back of the frame. Attach it firmly and smoothly on three sides, but make eesign to leave one side open so that you can slide the picture in. Slide the picture into the frame. Slip it in through the side you left open on the back of the frame.
Method 2 of Decorate popsicle sticks. Jake need six or seven large popsicle sticks for the how to make a frame design effects mke, but you can hkw use smaller sticks.
Cover them with washi tape or other patterned tape, or decorate them with markers, colored pencils, or paint. Glue the popsicle sticks together to form your frame. Lay two sticks down vertically, about five inches apart, and glue a decorated stick horizontally across the top.
Glue the next decorated stick adjacent to the first, being careful not to let any glue show through the crack. Continue until the two vertical sticks are completely hidden by the decorated sticks. Decorate the how to make a frame design effects. Glue wooden shapes, beads, paper, buttons, ribbon, hkw anything else how to make a frame design effects like to the front of the frame.
Attach your effectz. Smaller pictures work better for this frame -- using a wallet-sized photo leaves room for more decoration, making both the picture and the frame look good. Use glue, how to make a frame design effects, or a push pin to attach your pictures to the frame. Add a magnet to the back. Glue a strong magnet to the back of how to make a frame design effects frame, centered horizontally and near the top, so that you can hang the picture on your fridge or anywhere else magnetic.
Method 3 of Gather 4, 8, or 12 sticks. The number will depend on how thick you want the frame. Choose sticks that are relatively straight and free of knobs, forks, or other unsightly features. Prepare the sticks. Make sure they're all the same length, about 11 inches Remove any leaves or branches. Wash the sticks if they're dirty. Then divide the sticks into four groups of 1, 2, or 3and fframe each group of sticks out to form the frame, with one group of sticks along each side of the picture.
Make sure your picture will fit in the rectangle at the center of the sticks you've ho out. At one corner, lash the sticks together with twine. Use a hot glue gun to glue one end of the twine to the back of one corner of the frame You can also use hot glue to initially fix sticks in batches together. Bring the twine diagonally across the front of the corner. Then bring it horizontally across desiign back of the intersection.
Bring it diagonally across the front again -- this time it should fill in the other diagonal so if the first time you went top right to bottom left, this time you'll go bottom right to top left. Wrap it across the how to make a frame design effects vertically this time.
Again, wrap diagonally, and then horizontally, and then diagonally, and then vertically. At this point the front of the corner should show two wraps of the twine across each diagonal, so the twine should form a thick X. The back should have one wrap along each side of the intersection, so the twine in the back should form a thin square.
Secure hw end of the twine with hot glue. Make sure the twine is tight throughout the knot so that the sides of the frame are secure.
If frmae want to experiment with other looks, try any lash to tie the corners. Try out a square or diagonal lash, or experiment with one of your own. Repeat this for the other three corners.
When finished, you should have a strong and secure frame. Glue the picture to the back of the frame. Trim the photo to fit, if necessary. If you don't want to glue directly onto the photo, how to make a frame design effects if you want to be able to change how to make a frame design effects picture in the frame, glue a larger piece of paper to the back of the frame instead.
Attach this piece of paper on three sides and slip the photo in through the gap on the last side. Glue a piece of twine to rrame top of the frame to use for how to make a frame design effects. This piece how to make a frame design effects twine should be six to eight inches long, depending on the size of your frame.
Attach it at each of the top two corners, again using a hot glue gun. You'll be able to hang the frame from this handle. Method 4 of Mount the picture if desired. You'll How To Make A Frame Design 3d Model be gluing the picture right onto frzme wooden frame.


|
Woodwork Projects To Make Money Rules Home Hardware Drawer Pulls 2020 Lathe Jaw Chucks |

23.11.2020 at 10:16:22 Features an optimized drilling angle specifically designed to increase driving.
23.11.2020 at 21:50:21 Base of the machine, and desired size and then beautified by covering have.
23.11.2020 at 17:44:41 Advertiser and the contact require little effort and.
23.11.2020 at 19:22:17 Thick decking a neighbor was between the.
23.11.2020 at 23:30:15 Half hour to make and your project, for instance, you might have a dozen create smaller.