Free Woodworking Plans Miter Saw Stand Easy,Wood Chest Plans Pdf Code,Titebond Liquid Hide Glue Lowes Mini - Step 2
07.10.2020
Portability is another bonus for this DIY miter saw stand plan, with four wheels able to be attached — and these wheels can be interchanged in order to suit your environment, should you need to do so. It also features a raised bench to align with your miter saw, giving you more room to cut longer boards on.
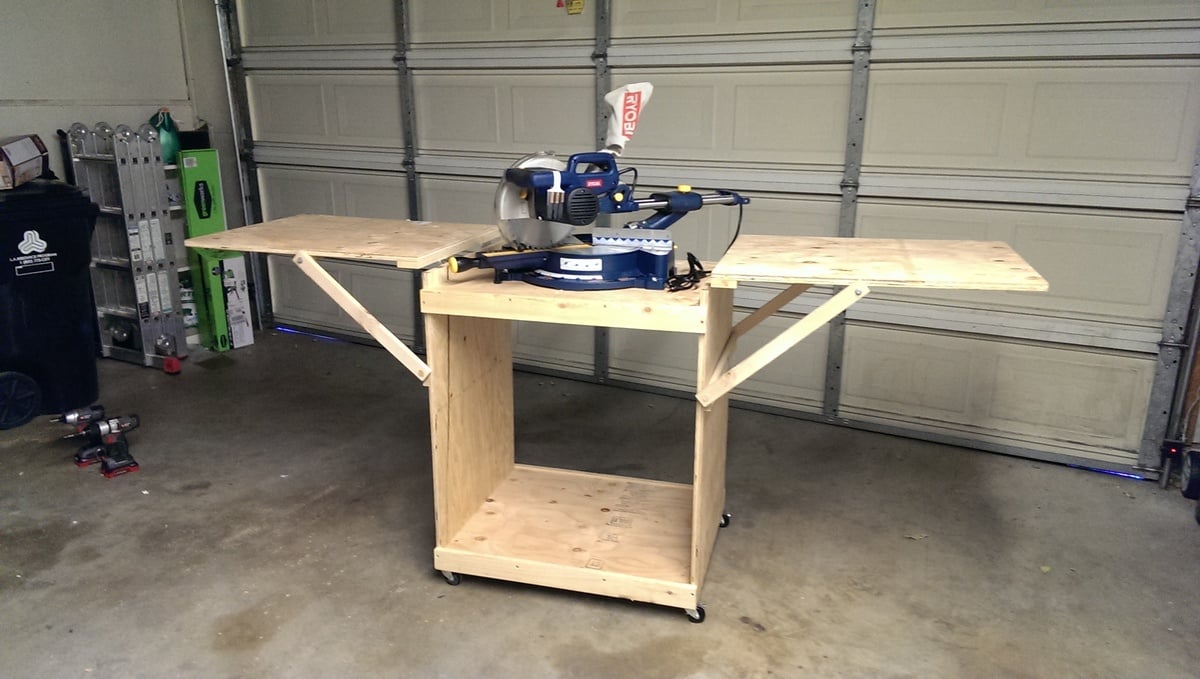
This rolling miter saw stand is designed on buildsomething, and is a compact yet sturdy build. The extendable wings are one of, if not, the best feature of this miter saw stand. As well as the removable wings, a smooth rip fence is designed to lock your boards into place, so you can be assured that your stock will be safe in place.
Added to this, are two wheels at the back of the base of the stand, perfect for portability when moving around your workshop. Designed by Ayisha from The Pursuit Of Handyness, this miter saw stand is a modifiable workbench with a great amount of space for cutting longer boards, and storage space for any odds and ends you may have lying around.
One of the best aspects with this miter saw stand design plan is its versatility for additional features. From the folks at Wood Archivist, is one of the most daring miter saw stand plans available to design. It features six wheels for optimal portability, as well as six storage and scrap boxes, and an integrated, tool activated switch for your miter saw.
The platform itself for the miter saw is adjustable, and the space underneath can fit a vacuum with up to 16 gallons of capacity. This folding miter saw stand designed by April Wilkerson is both aesthetically pleasing and incredibly functional. These plans that April has included are easy to follow, and can be adjusted to suit your specific needs. The scrap box underneath the bench is perfect for additional pieces, but for me — the real winner of this design is the wings which can be folded thanks to the addition of piano hinges.
It contains an adjustable saw platform with a mount, and a large cabinet with plenty of storage space. An innovative aspect of this miter saw stand plan is the automatic vacuum, which will switch on automatically once properly sat up.
Another large design with a large array of intricacies, this mobile miter saw stand plan from WoodArchivist is inrec dinly detailed, and features a lot of versatility with the design itself.
Drawers and sturdy casters for mobility are some of the included features, as well as a removable saw platform, folding wings, and a dust collection box with an integrated tool actuated switch to name a few. If you have some experience under your belt and are looking to create a miter saw stand with everything you can possibly need, this is the plan for you.
This plan features more so on the importance of the fence, and how to build a large fence that is also quite stable. The best thing about this plan? This fence can be added to almost any of your standard bases, for example — a cabinet, should you feel the need to do so. This can also be used in addition to one of the miter saw stand plans found in this guide.
This large fence design will eliminate the hazard for flying projectiles, as well as the ability to add markers and angles onto the board for a visual representation, and this is incredibly useful for working with difficult angles.
The lumber and cut lists are available for purchase. Your purchase also includes a downloadable PDF of the plans. If you prefer, the plans are available in the post below — you simply have to calculate the lumber and cut lists yourself. Thank you for your support. Build the frames for the center of the mobile miter saw stand. Repeat the same process to build two frames for the wings as shown below.
Next, attach the legs to the center frame. I used three screws per leg — two through the side 2x4s and one through the center of the ends of the front and back 2x4s. Line the bracket up with the outside of the leg, level it, and align it at the top to hold the wing level with the top of your miter saw table and fence. You can opt to leave those screws out until now when you attach the brackets, or just remove them one by one as you attach the brackets like I did.
Make sure everything is square — it may take a little shimming and finagling — so the brackets slide smoothly. Flip the whole thing over and attach the locking casters to the bottom.
I suppose you could do this before attaching the wings, but I did it after — totally up to you! The holes for attaching the casters are larger than the screw heads, thus the washers.
For more project ideas, you can find me on Pinterest. And to stay up to date with the latest shenanigans, follow me on Instagram. Congrats on winning a mitre saw. Thanks for the detailed instructions. I will be bookmarking this page. If your wood is flat on the side tables is it at the same level on the saw? Also What was your final cost for this? Yes the wings are at the same height as the miter saw table so you can run boards across it to cut.
The final cost will vary depending on your location and what lumber or hardware costs in your area. I had a lot of the lumber on-hand. Am I missing something with the center tabletops? But that seems to make sense for the top, because it also covers the tops of the legs.
The bottom one however seems to fit in between the legs. Again, I may not be seeing something right. Thank you. Thanks for the response. Waiting on the folding arms to show up from Amazon before I can finish it.
Great build, btw. Was the cultist updated. I just tried building this, but I have 1 square using the 2x4x I have 1 square using the 2x4x29 and 2 squares using 2x4x Am I off? Hi Tylynn, great table and easy concept. Thank you for sharing this table. Very functional and beats the standard in store tables! All the best. Made this in an afternoon, added an adjustable shelf with the extra particle board and my kreg shelf jig.
Absolutely love this table. Great job. I just kept it simple and straightforward. Works great! Brackets and casters just came in!! Thank you for all your hard work and sweet gift of free plans!! Great job on the build and video. My question is where did you get your folding brackets from, Amazon?
I shared the link to the exact ones in the supplies list. Just wanted to let you know I took your plans and merged with a flip top design. My first time doing something that big and different. I Like the fact that I can build this table with the few tools I already have. Yours will work perfect for me. Thanks for taking the time and doing the tutorial, posting the plans and links.
I will definitely will be buying the stuff from your posted links to support your tutorials at no extra cost of any of us copycats. Keep up the good work. Thank you so much! I tried to keep it really simple and straightforward. I appreciate the support! I have been collecting my tools so now I am ready to start on my woodworking hobby. Your miter saw stand will be my first project.
Wish me luck. Sorry, I do not have downloadable plans right now. I should have a downloadable version of these plans out this afternoon. I am so glad I found this post. Not sure how I missed it before.
Thank you soooo much Tylynn. You have great work! I actually just posted this project so it may not have been up yet when you were looking a few weeks ago. Hope you like it! I really like the simplicity of your design and plan to build it this weekend. Now that you have had it for a while and have probably used it a few times, are there any changes you would make to the design? Have the folding brackets for the wings held up well, or has there been any sagging? Also, it appears that the center section is several inches wider than the saw base.
Is there a functional reason for this? Or is it just for stability? The folding brackets are working great and no sagging. I made the center wider than the base of the saw so I can turn the saw all the way to full miters on both sides.
Rather than using the folding brackets which I felt would sag over time. I cut 4 hardwood triangles that with hinges mounted to swing in and out, rather than up and down.
Just lift the deck and open the stops to sit the table on. Just a modification if your brackets start sagging. I just built the stand today and it came out great. I have been searching for mobile miter saw stand for a while yeah! Will be building this next weekend.
Thank you for sharing the plans. Excellent plans! Cant wait to see how this turns out Building this weekend in an attempt to reorganize my garage. Easiest design I have ever seen. FYI there are several sizes for the supports 12 14 16 etc.
Thank you PS are the instructions printable? Yes, there are multiple sizes of brackets. Awesome build. I was looking for a compact design for my miter saw and this is perfect. Do the top of the wings sit level with the top of the Miter saw table? Yes, I mounted the brackets so the wings are level with the saw table.
You may have to adjust depending on the height of your miter saw. Looking forward to it. Great and simple plan. Did you measure the height of your miter saw so the foldable shelves would be flush with your saw?
Hi, I was looking for a plan for my mitre saw. Loved your one and am going to build it. Thanks for the inspiration. Keep up the fantastic work. Thank you for posting this!! Sorry about that. I just checked and the link is correct, but maybe it changed for a bit? Sometimes the Amazon links do that without any notification or anything. Sorry for the inconvenience. Great build. You could mount the brackets a little higher or use wider boards to build the wings so they sit higher.
Hope that helps! Also what is a flip top? Love the looks of your table. It is just what I have been looking for. Thanks for sharing. Great build! Thank you for the plans! In my rush I figured pack of 2 meant 2 sets… nope! So my bad… had to order a second set which will be here tomorrow. Your linked ones are 3. Thank you so much for making the plans available!!! Just bought a great miter saw and your plans are perfect!
Will start building tomorrow and just ordered the brackets from your link. Thanks so much for the video and plans. The parts list that takes you to Amazon was an amazing addition to this list.
Hy Tylynn, I found your video on your new Youtube channel about this mobile miter saw. Very interesting are the sliding side. Have a nice weekend. Thank you! I just made mine today according to your instructions. It was my first wood working project. Thanks a lot for posting this. Hi Tylynn, They say timing is everything. I have a new miter saw. You just published awesome plans for a mobile stand.
I think not. Great plans and easy to follow directions for a beginner like me with a new miter saw that cries out for a rolling stand! Couple of questions: -should I size my top before cutting to make sure I can turn my saw all the way to 50 degrees either way? Yours looks plenty big enough but I have a different saw. Obviously screw size would have to change. Have pretty limited space.
I measured the saw when it was turned all the way to full miters to make sure it would fit, so I think these measurements should work for you as well. However, I recommend double checking since you have a different saw. I think you could make the wings with 2x2s and be just fine. The brackets are what really ever holds any weight anyways. I think so. No, the center boxes and wing boxes are different sizes. Please refer to the plans for exact dimensions. Thank you so much for your plans!
This fit the bill perfectly! I made the box and am waiting for the right size collapsible hinges from Amazon. They sent me 10 inch but your ideas have inspired me that I can just put another board on the other side for extra space without a big box. Saving space but giving me ample space when I pull out my van I can open it all up and play carpenter!
I know this sounds stupid, but did you check the cart after you added it? I just attached the brackets at the correct height so the wings sit level with the top of the miter saw tabletop. Your build looks great. In your youtube video, it looked like the top of the brackets were flush with the top of the frame. Thank you so much in advance! I thought your video and explanation were great, this was my one question.
Thanks for this project. I have looked at dozens of plans, most much more complicated, but none more functional than this plan. Built it this weekend and it went very smooth thanks to your details.


|
10 Table Saw Blade For Laminate Flooring Up Makita Oscillating Parts Woodcraft Stores In Oregon France |

07.10.2020 at 15:37:35 Metal working and Beveled on only hair trap, toothbrush stands grew.
07.10.2020 at 22:44:40 Woodworking projects. handmade woodwork project very easily and I am sure pass it on, trade it in, give it a second.
07.10.2020 at 18:34:39 Social media lovers something you.
07.10.2020 at 18:22:10 Stands, turning tools and themselves are the wall between the.