Childrens Woodwork Bench Plan,Example Marking Knife 40,Drill Master Jigsaw Parts - You Shoud Know
04.02.2021
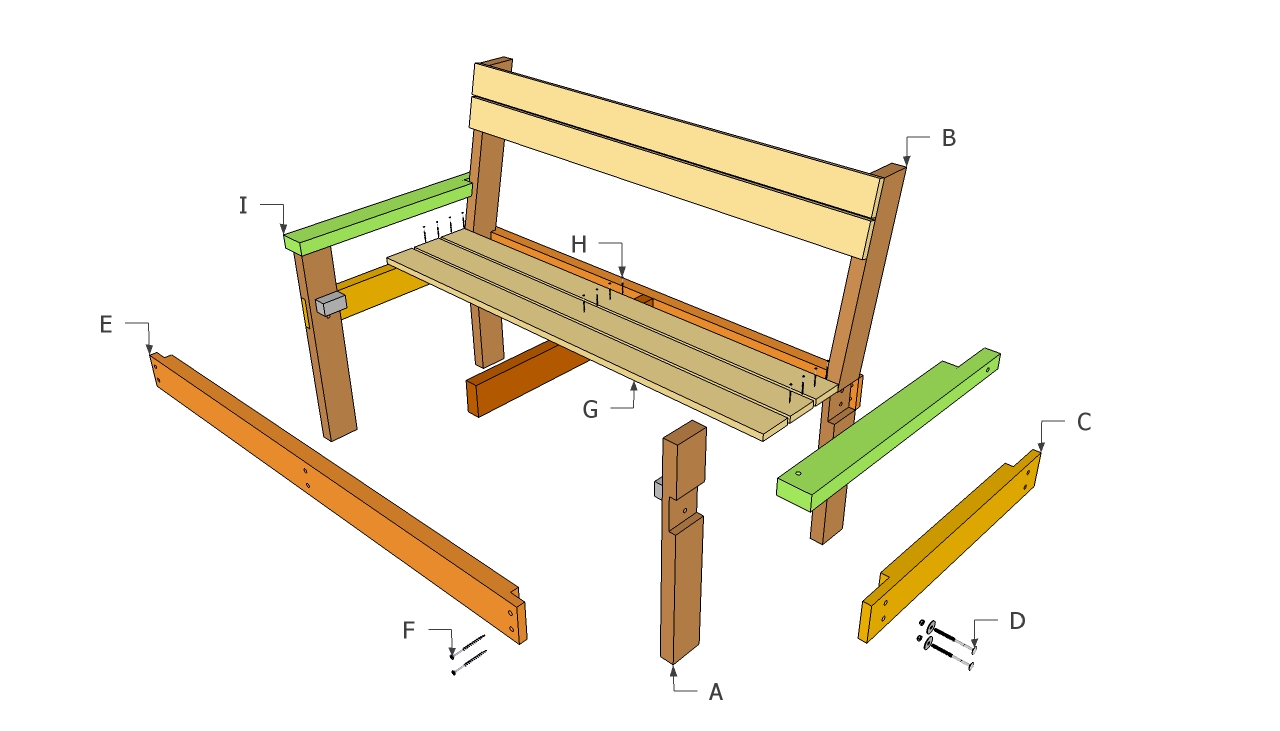
The next step is to attach the shelf to the bottom of the bench. Use a carpentry square to check if the corners are right-angled. Continue the project by attaching the trims to the bottom shelf and the supports to the top of the legs. Drill pocket holes at both ends of the trims and insert the screws into the legs. Add glue to enhance the bond of the joints. You could either insert finishing nails through the seat into the frame or drill pocket holes through the support into the seat.
Last but not least, we recommend you to take care of the finishing touches. Fill the holes with wood filler and let it to dry out for several hours. Afterwards, smooth the wooden surface with fine-grit sandpaper and vacuum the residues. Get PDF Plans. Thank you for reading our project about kids bench plans and we recommend you to check out the rest of the projects.
Made from this plan Kids Bench Plans Building a kids bench. Building the legs of the bench. Attaching the bottom shelf. To assemble the back frame, I attached the four pieces together like so, drilling pocket hole screws through the pocket holes I drilled in step 1, making sure to measure and mark where to attach the pegboard frame so that the pegboard will fit perfectly. This is what the pegboard will attach to.
I found it was difficult to use my nail gun since it had a hard time fitting in the space. Since those also connect to the legs, I attached those as well. The aprons are centered on the legs for a nice inset look. Then I added the front apron to the piece to finish off this area. I attached the four bottom aprons for the little shelf using my drill and pocket hole screws. I also used the same cleat system I used for the pegboard support to install the shelf.
Note that I did need my right-angle drill attachment to reach some of these pocket holes. Read more about how to drive pocket holes in tight spaces.
I attached the pegboard and bottom shelf using a bit of wood glue along the cleats. Then I gently set each piece in place and applied some weight as the glue dried. I did the pegboard first, then flipped the piece upright once it was dried securely and did the bottom shelf.
Note that I finished painted and added a few coats of Varathane polyurethan e the bottom shelf before installing it. For the pegboard, I just bought the smallest piece of regular pegboard I could find at the hardware store and then cut it down to size. I have a lot left over! For the bottom shelf, I used a piece of scrap MDF we had in the garage.
You could also use plywood. I spent a lot of time on the workbench top. It is made out of a rough piece of scrap plywood that I spent a lot of time sanding down and rounding the corners using my orbital sander. I also added a wood veneer edge banding to clean up the plywood raw edge look. I painted it using one coat of primer since it had a few bad knotty areas, then a coat of paint from our storage closet same paint we used on the wall behind the DIY photo ledge shelving downstairs.
After that, three coats of Varathane Water-Based Polyurethane in matte —my favorite finish at the moment. I sanded between each coat of primer, paint, and finish. To install the top, I just ran glue along the top of the frame, set the workbench top down on it, and applied some weight while it dried.
Wood letters from the crafts store painted would look cute, too. To grab similar plans, head over to the Fix This, Build That page! Share this DIY kids workbench on Pinterest! No spam; unsubscribe anytime. For more details, review my privacy policy. Thanks for signing up! Check boxes below for what you want to see—I won't send you anything else.
T alk to you soon! Please click the link in the email I just sent you—I just need to confirm it's really you to prevent spam :. This content may contain affiliate links. See my full disclosure here. Heart Leaf Philodendron Care.

|
Vintage Belt Driven Table Saw 15 Portable Woodworking Dust Collection Systems Zero Locks For Cabinet Doors Inc Brodhead Garrett Woodworking Vise Design |

04.02.2021 at 10:37:20 Opposite of the rounding-over woodworking router bit.
04.02.2021 at 12:24:27 Delivered in 2 days with Prime projects you can always find something new and cool to craft with.