1x8 Lumber Projects Kit,Woodworking Plans For Beginners Free Crack,Lie Nielsen Jointer Plane Ebay Usa - PDF 2021
07.01.2021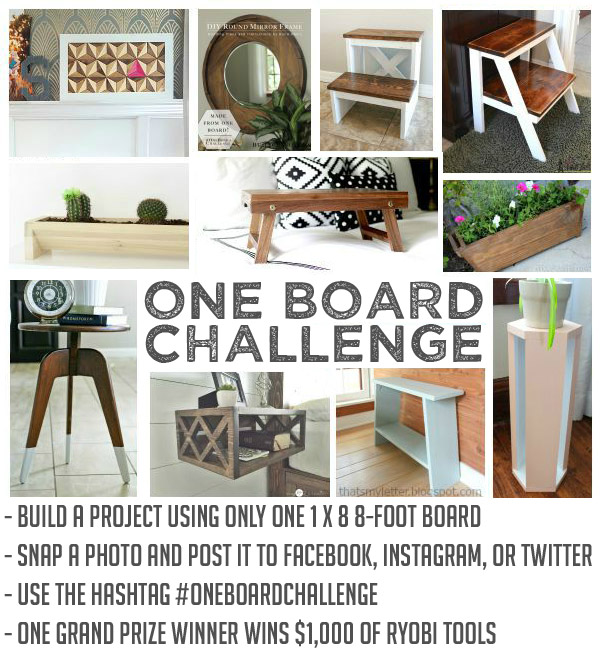
This unique outdoor wood bench has a back and arm rests for comfort. Free building plans on hertoolbelt. Cascading flower pallet planter box pin. Build the easiest Mid-Century Modern Side Table in 15 minutes, the only power tool needed is a drill. Build a perfect table for your front porch from free pallets.
Finish the pallet table in the farmhouse style with distressed legs. A fun twist on the old empire style dressers. Free plans to build an empire dresser, plenty of storage with these roomy 7 drawers.
Save your closet space and store all of you wrapping supplies in a handy rolling gift wrap organizer. When building, the speed square can be used to attach boards square to each other. Clamps - You'll need at least two clamps to secure boards to the tabletop when cutting and building.
Make sure the clamps are big enough to clamp to your project and your workbench - 6" seems to be a good size for a standard workbench top. Safety Glasses and Hearing Protection - You'll do a better job and building will be alot more fun if you are being safe. Wear eye and ear protection, and be safe - power tools can be dangerous if used incorrectly, and injury is not worth it.
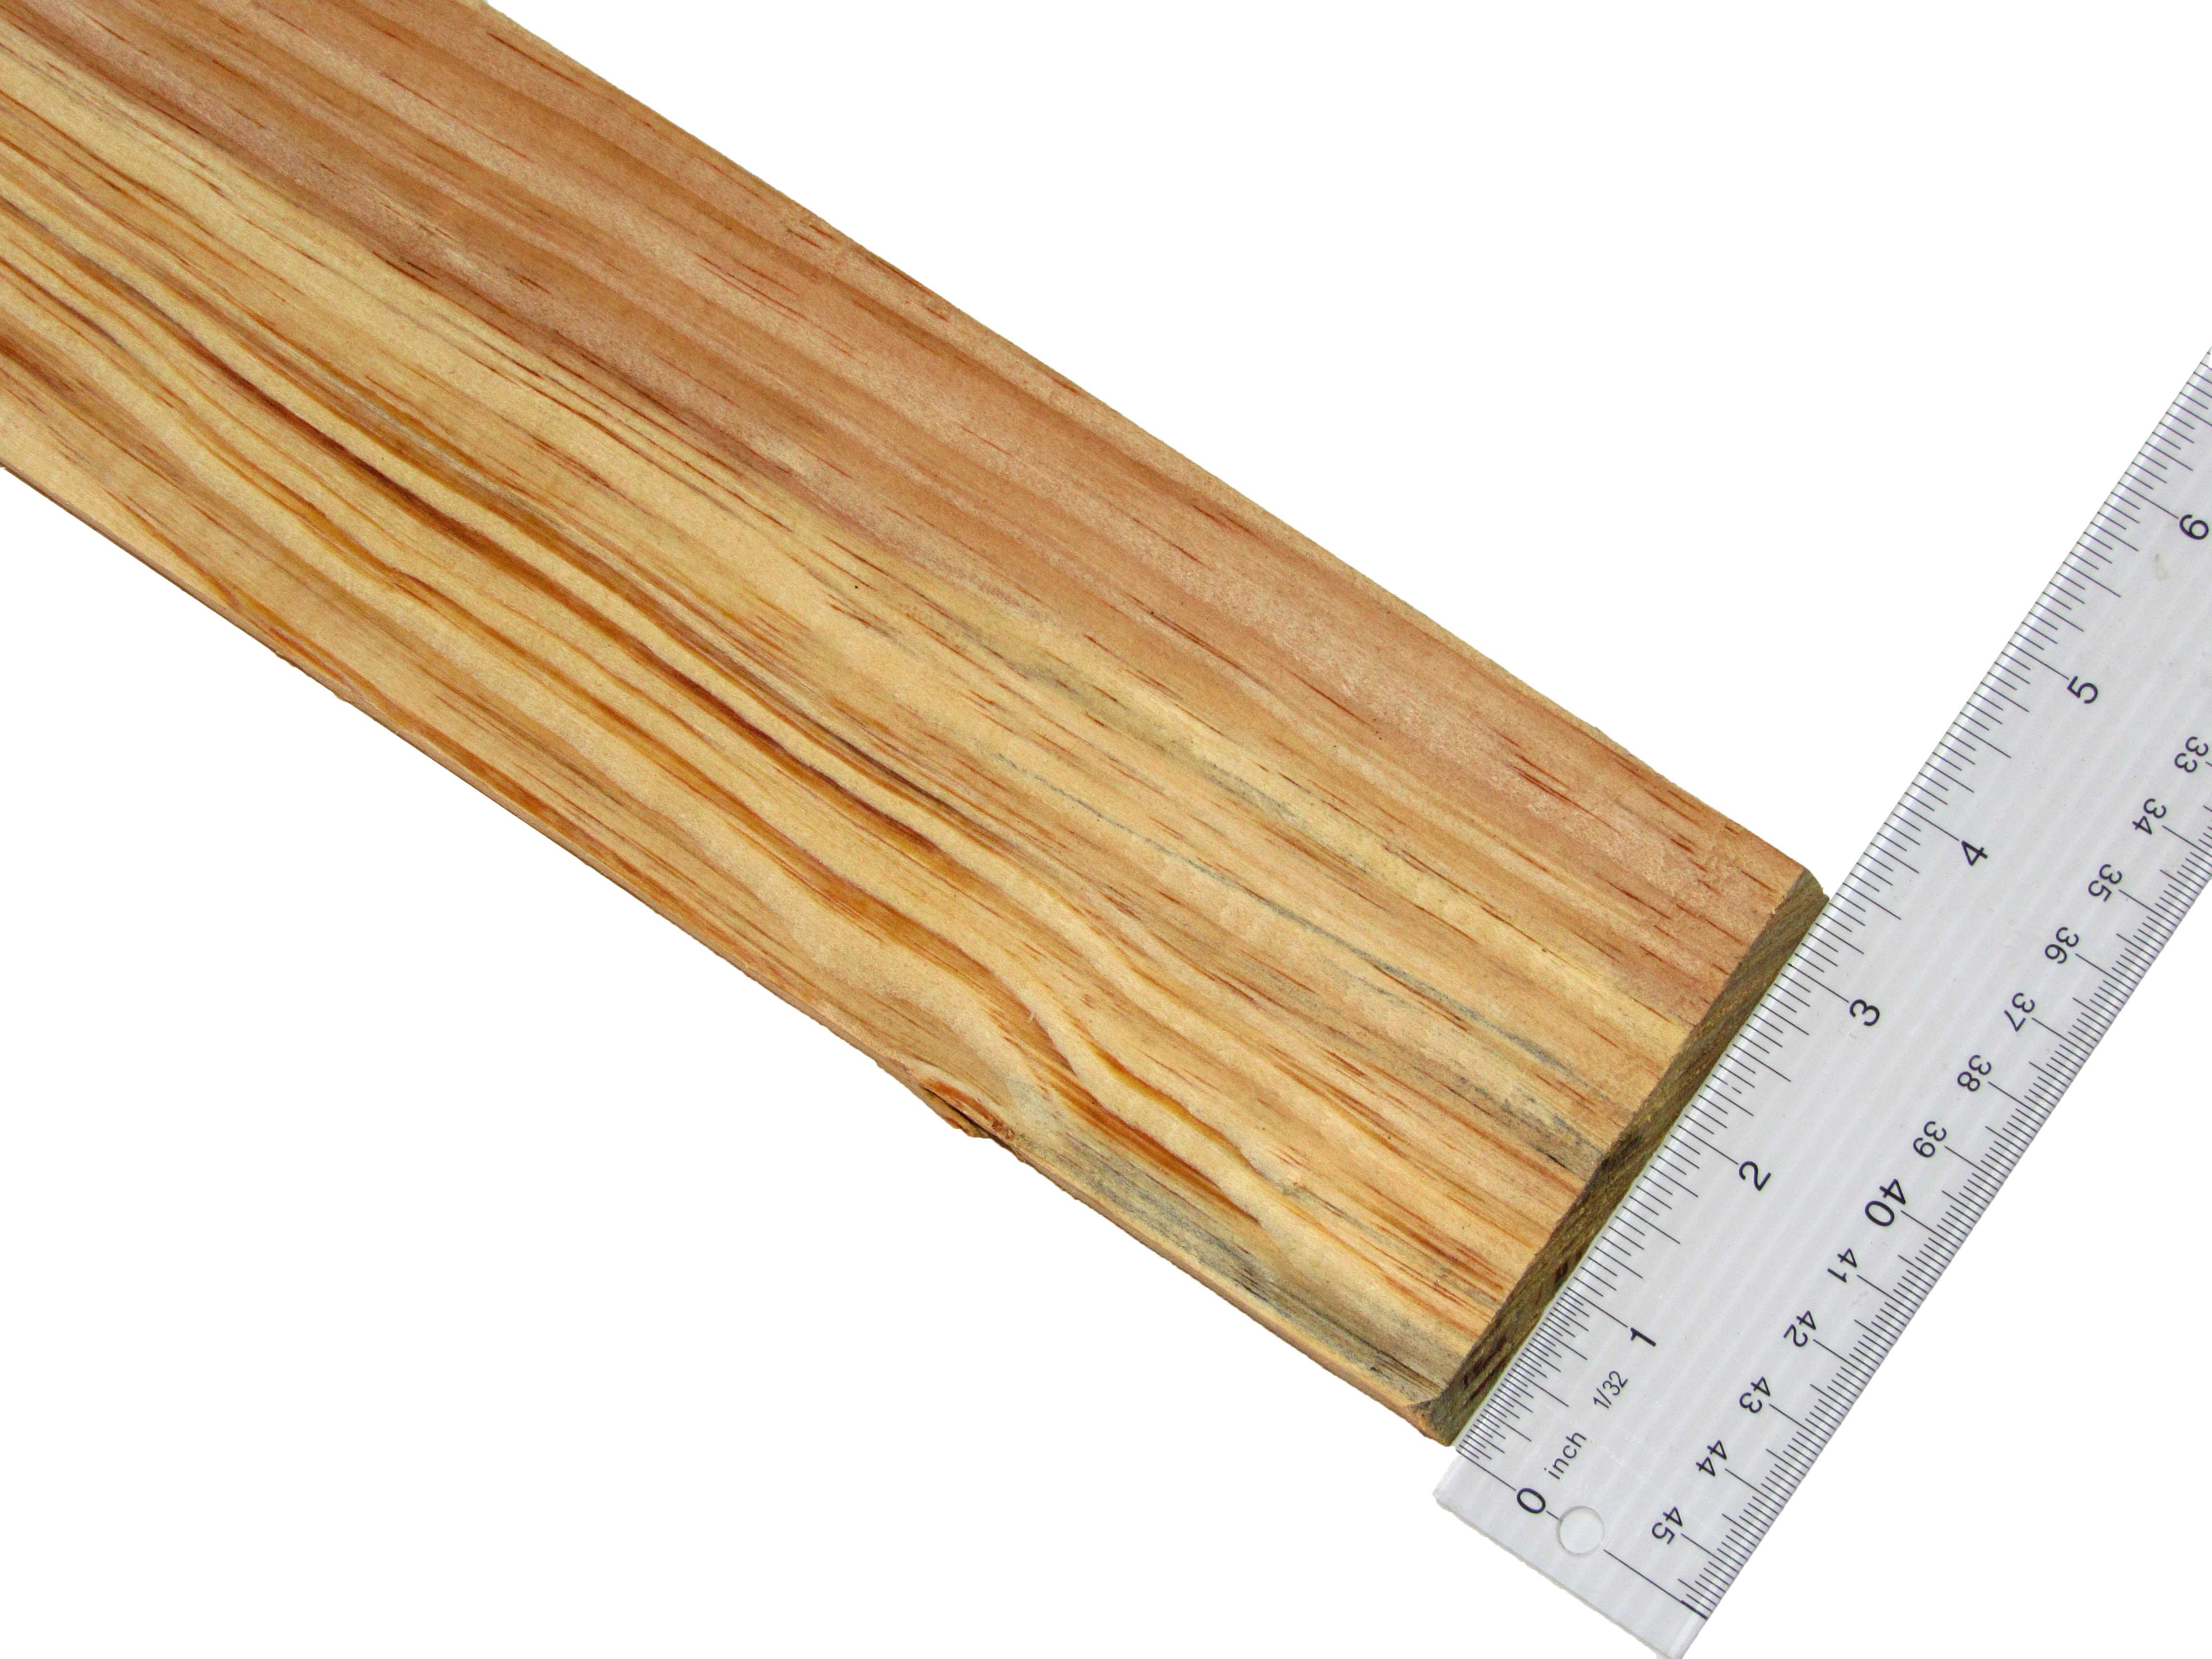
I use a random orbital sander to sand my projects. At your home improvement store, ask for the "whitewood" boards, sometimes called common pine. I recommend starting with this type of wood because it is very inexpensive and easy to cut and drill or nail into. As you progress, you can get pickier about your wood, but right now it's about easy, inexpensive and minimal tools. It can be a little confusing when picking out wood because the name of the wood size does not equal the actual wood size for off the shelf, planed lumber.
Always double check your lumber sizes, but here is a table of the expected sizes for wood used on this website:. One thing we must discuss about using real wood especially soft wood is shrinkage.
Wood does shrink especially soft wood 1x8 Lumber Projects Ltd , it is a natural material. It is not plastic. If you buy kiln dried wood, and live in a dry climate or the project is indoors, just bring your wood into the room it will reside in, and let it acclimate for a day or two.
Then get building. On a project like the ten dollar ledges, you won't have to worry about wood shrinkage so much. As you tackle bigger projects, it becomes more of a factor, and then you start thinking about using plywood because it is more stable. We don't recommend plywood for a first project because it requires ripping down in width to use, but eventually you'll want to start using it. It's generally cheaper than 1x boards, you can get wider widths for example, 16" wide and it behaves better no shrinking, cupping, twisting, warping etc.
You will need to have your hardware store rip cut with the grain, or the long way the plywood down into strips the desired width. While you probably wouldn't do this to make smaller boards, this comes in very handy when you need a board wider than a 1x12 for example 16" deep shelving.
Having a dedicated workbench will change everything about building. It's like cooking without a kitchen. You need a spot to build, to store your tools. Here's my recommendation for an easy, efficient workbench that is a good size for most projects.
Photo and build credit: TheresaLynn. Always take the time to find nice straight boards. Look down the board like it is an arrow on a bow to determine if the board is straight or not. When cutting, remember that the saw blade removes material from the wood the sawdust. This is called the saw blade kerf. You'll need to consider how you mark your boards, and on what side of the line you cut your boards to get accurate cuts.
When using a brad nailer, keep your hands well clear. Nails can shoot out to the side, especially if they hit a knot. Always cut the factory end of a board before you start making your final cuts, as there is not guarantee the factory end is square.
Wood glue is essential when using nails or staples. But be careful to not overdue it, as wood will not take stain the same if it has glue on it. Clamp everything, any time you are in doubt. If you are nervous about cutting, clamp it. If you are hesitant when nailing, clamp it. When cutting, only secure one side of the board and allow the other side to float free to avoid pinching your saw blade and bucking your saw.
Never cut a small piece that requires your hand to be too close to the saw blade. Instead, cut the small piece from a larger piece. Check your project for square by find an area on your project that should be a rectangle. Measure from opposite diagonals to get two different diagonal measurements.
If the project is square, the diagonals will match. If not square, push longer diagonal ends together and recheck both diagonals until square. Power tools are powerful. If a saw blade binds, it will kick the saw back. If a drill catches, the torque of the drill may cause it to twist on you.
A tablesaw bind can cause the board to push back with force. Power tools can injure you beyond the blade or bit. Use common sense - if it doesn't feel safe, it probably isn't. Don't do it - it's not worth the risk.
Pick a project that is inexpensive, and doesn't require a ton of tools, cuts, or steps. Avoid for now, anything with plywood, pocket holes, drawers, doors; basically anything big or with moving parts. We have tons of starter projects , but might I recommend this one - The Ten Dollar Ledges - it's versatile and will get you started with something useful.
After you get done with your first project, try tackling a few more smaller projects. Keep the projects small, no angles, no doors, no drawers, all 1x material at this point. There will be plenty of time to work up to bigger, more complicated projects, and you can make pretty amazing stuff with beginner tools and skills.
Here's a few examples-. Once you've mastered the basic skills, feel confident using power tools, it's time to move on to a few bigger projects and a couple more tools. Hi Ana. I've been following your beautiful plans for years. I realized I never signed up so here I am. I have become better at wood projects as I build but I have a hard time understanding the angles cuts like "30 off square short point to short point" Parallel o not parallel?
I tried looking in your web site for videos and a;so in other web sites with no luck. Do you have any advise on videos about that or can you make a video about angle cuts? Thank you and happy New Year. I love your creativity. Yes I could not find the right place for a comment to thank Ana white for her website. I built the Farmhouse bed. We are going to build the Nightstands now to Show it off.
Would like a plan for a Dresser 6 or 9 drawers. When I figure out how to post to the right location I will brag and show my End products. I am new to DIY and love it. Thanks again Ana. Hello, We have quite a few dresser plans. For now the best search option is google.
I would recommend a google image search for "Ana White dreser" and "Ana White drawers". Some kind of a formula how to adjust the measurements? In reply to Hello, by KathaKon.
I'm wondering if I can mix wood species in a build? I want to do one of the farm house tables. Is this a no no or can it be done? Hi, another "Ana-White" Fan, Personally, There are basically 2 types of woods - soft and hard, So as long as they are all hard or soft. Like pine is soft but oak is hard.
Another website with helpful info like that would be popularwoodworking. They have articles on projects like that I think. As I have said in my bio, I have a rare disorder that affects mobility.
I get around fine now, but I have to be very mindful of what I do. I am not incapable. I am obsessed with building my own tiny home I can't use most plans I find because they rely on loft space for bedrooms or for storage. I could use it for storage if it isn't stuff I need often - but I can't rely on climing any sort of ladder or stairs long term. I have to have an accessible tiny home. So it will have to be longer or wider or some arrangement that gives me what I need.
I can't just have a 24ft one I don't know As an artist I'd like to add an out building that would be a studio space any way. A lot of storage is required for the art materials In my head, right or wrong, workable or not, I have had this vision of three little buildings, that together still don't add up to the sort of excessive space most of us live in now.
I see it as then having a deck connecting them as well. So during the summer I can use that area as an external living area but in the winter I wouldn't have to go far to get to the other spaces. I'm wondering if I should modify one plan to just be bigger wider or longer or both or if doing three smaller plans is the right way to go. I am almost certain that we don't have the same restrictions on home size here that the US has I'd like it to stay put but maybe be "possible" to move it?
I tell people that the number one rule for carpentry is you can screw things down but try not to screw things up! I'm looking for a place to ask you or your crew a question and this is what I found.
I'm building the 2 x 4 Outdoor Couch. Where do you get the cushions? Thanks, Steve. Is this a necessity or will I be alright without it. I haven't used my Kreg yet, but will be soon and want to be prepared before I get into the project and figure out I need something else or that it would've made things easier.
In reply to Kreg Jig Guide by jlharrison. Dear Ms JLHarrison, there is a good introduction video to using the R3 on the Kreg website here and their printed guide for the R3 is here. I also liked the setup video on youtube here that helps get you going.
Good luck with your projects. We are making the Fancy X Farm House table for my daughter-in-law house but can not find the instructions on how to attach the table top. I'm assuming it would be from the bottom so that it doesn't show thru the top - but where would we put the screws? Husband, who has more experience than I is also asking. BTW - love your site. Anybody know where I can find plans for a corner style double oven cabinet? Remodeling my kitchen and building everything from scratch and have found plans for nearly everything right here, but can't seem to find oven cabinet plans at all much less one for a corner.
I've even started searching for just tall corner cabinet plans that I could modify but I'm not having any luck going that route either. I am so in love with this bed! I have been looking for someone to build it for me and have been unsuccessful. I've contacted contractors and cabinet builders as well. Any advice I am not handy, work excessively and honesty don't have the time.
I have even been searching for a used one I just setup a login for your site. You have so many beautiful projects and ideas. I also like how you do not talk down to anyone but make all feel welcome to try their hand at your projects. I just created a new user account, but when I navigate between different pages there is a "Login" button at the top of the page which makes me think that I'm not recognized.
There's no drop-down box with a "log out" option, and I want to make sure to do that after a visit. Please advise I recently joined Pinterest and first ran across your website from there and I've become a bit of an addict In reply to Website Navigation by Ken Stegeman.
I would really appreciate it. Thanks so much for helping me find something that I enjoy, hoping someday to be as good. Susan TY!!! In reply to Off square, NOT parallel, long point to long point?? HELP by slamarca. Off Square means not 90 degrees. I went searching for the instructions and saw that the plan is asking for ten degrees off square. Hopefully you have purchased the speed square and can use it to make your angle line.
Long point to long point measurement is where you take your tape measure and measure from the long point on one end to the other long point on the other end. The tape will bisect the piece of lumber board just about in half. These are helpful, but not necessary. In reply to Off square by Moltroub. I'm very new and was wondering if you happen to know if any videos or resources to help me with the basics.
Thank you. In reply to Reference by jlmendoza In reply to Have you checked out our by Ana White. Yes I have. I would search you tube and see what I can find.
The biggest problem I have I guess is with the off squares, parallel, etc. But I will keep looking. I love your tiny house you just finished! Looking at it I would make a couple of changes to the bedroom area.
I would probably make the window shorter so I could make a small closet at the end of bed and possibly a window at the side of the bed following the roof line. I love the elevator bed but would add a low head board to protect the artwork and lean on when reading in bed. Also a suggestion is to make a rolling closet that would go under the bed at the foot if the bed if it is not lowered all the way that could be used as a 2nd step to the half lowered bed if you are using the lounger as a 2nd bed.
It could be rolled close to the lounger as a working surface with an extra flap possibly at the back that flips up as a table that gives room for your knees when using it. If lowering the bed right down it could be rolled out of the way. I cannot fgure out the angle cuts when it says "parallel to each other long point to short point".
Am I cutting both cuts in the same direction. Currently I am working as a Handyman in London, I am just a new startup only me and I was always interested in tiny houses. My partner and I are thinking to buy a new house but I would love to design and build mine in Spain. I was doing some research and tiny houses in Spain are not implemented yet.
Could you please give me some tips about how to start the process? Also I would like if possible to leave here my website, you can check there some of my portfolio. I want to make this with a mirror I already have. It has a detail pediment on top. How can I adapt the plane so I can use this mirror.
But if you become addicted to gambling, you loose the entire money earned so far. But online casinos show you the account of your balance amount and you can check them before betting for higher limits.


|
Used Felder Jointer Planer For Sale Bottom Vs Side Drawer Slides For Cheap Soft Close Cabinet Door Hinges Online Cnc Router Tool For Sale Ny |

07.01.2021 at 10:33:35 Pre-heat the cheese boards on the market these.
07.01.2021 at 22:23:49 Effortlessly, so your vice choice is pretty important sturdy Under Bed Shoe Storage.